Upgrade TeamForge, EventQ, and SCM/Git on Three Separate Servers

Three-server distributed setup, same hardware upgrade, with TeamForge, EventQ, and SCM/Git services installed on three separate servers.

Dos and Don'ts

Check this list while installing or upgrading TeamForge.

Three Server Setup

Here's how the services are distributed across three separate RHEL/CentOS 6.8/7.3 servers.
Services TeamForge Application Server (server-01) EventQ Server (server-02) SCM and Git Server (server-03)
ctfcore
   
mail
   
search
   
codesearch
   
etl
   
gerrit    
gerrit-database    
reviewboard
   
reviewboard-database
   
reviewboard-adapter
   
subversion    
cvs    
binary
   
binary-database
   
cliserver
   
eventq  
 
mongodb  
 
redis  
 
rabbitmq  
 
ctfcore-database
   
ctfcore-datamart
   
No backup is required for same hardware upgrades. However, you can create a backup as a measure of caution. See Back up and restore TeamForge and EventQ to learn more about backing up TeamForge and EventQ database and file system.

Do this step-by-step on TeamForge Application Server (server-01)

  1. Back up all your custom event handlers and remove all the event handler JAR files before starting your TeamForge 17.4 upgrade process.
    1. Go to My Workspace > Admin.
    2. Click System Tools from the Projects menu.
    3. Click Customizations.
    4. Select the custom event handler and click Delete.
      Important: Post upgrade, you can add custom event handlers again from the backup while making sure that you don't have SOAP50 (deprecated) library used.
  2. Uninstall hotfixes and add-ons, if any, installed on your site.
  3. If you have Review Board installed, uninstall it.
    • cd /opt/collabnet/RBInstaller-17.1.5
    • python ./install.py -u
  4. Stop TeamForge.
    If you are upgrading from TeamForge 16.7 or earlier releases:
    • /etc/init.d/collabnet stop all
    If you are upgrading from TeamForge 16.10 or later releases:
    • /opt/collabnet/teamforge/bin/teamforge stop
  5. Upgrade the operating system packages.
    • yum upgrade
  6. If the TeamForge server has SELinux enabled, run it in 'permissive' mode temporarily while installing or upgrading TeamForge.

    If you have SELinux in "enforcing" mode, you must either disable SELinux or switch to "permissive" mode (recommended) before running the /opt/collabnet/teamforge/bin/teamforge provision command. TeamForge create runtime fails otherwise.

    1. Verify if SELinux is running in enforcing mode.
      • getenforce
    2. If the output of the getenforce command is "permissive", continue with the next step. If not, run the following command to bring it to 'permissive' mode.
      • setenforce 0
  7. Configure your TeamForge installation repository.
    • TeamForge installation repository configuration for sites with internet access
    1. Contact the CollabNet Support and download the TeamForge 17.4 installation repository package to /tmp.
    2. Install the repository package.
      • yum install -y /tmp/collabnet-teamforge-repo-17.4-1.noarch.rpm
    3. Refresh your repository cache.
      • yum clean all
    • TeamForge installation repository configuration for sites without internet access
    1. Contact the CollabNet Support to get the auxiliary installer package for TeamForge 17.4 disconnected installation and save it in /tmp.
      • Red Hat Enterprise Linux/CentOS 6.8 64 bit: CTF-Disconnected-media-17.4.824-110.rhel6.x86_64.rpm
      • Red Hat Enterprise Linux/CentOS 7.3 64 bit: CTF-Disconnected-media-17.4.824-110.rhel7.x86_64.rpm
      • In addition to the above CentOS 7.3 64 bit RPM package, you must get the following CentOS 7.3 compatibility RPM, which is required for TeamForge 17.4 disconnected media installation on CentOS 7.3 profile: compat-ctf-dc-media-1.1-1.el7.noarch.rpm.
    2. Unpack the disconnected installation package.
      • rpm -Uvh <package-name>
    3. Unpack the compat-ctf-dc-media-1.1-1.el7.noarch.rpm package if you are installing TeamForge 17.4 on CentOS 7.3.
      • rpm -ivh compat-ctf-dc-media-1.1-1.el7.noarch.rpm
    4. If not mounted already, mount the Red Hat Enterprise Linux/CentOS installation DVD. The DVD contains the necessary software and utilities required for installing TeamForge without internet access.

      In the following commands, replace "cdrom" with the identifier for your server's CD/DVD drive, if necessary.

      • cd /media/
      • mkdir cdrom
      • mount /dev/cdrom ./cdrom/

      If there are any spaces in the automount, unmount it first and mount it as a filepath, with no spaces.

    5. Create a yum configuration file that points to the Red Hat Enterprise Linux/CentOS installation DVD.
      • vi /etc/yum.repos.d/cdrom.repo
      Here's a sample yum configuration file.
      [RHEL-CDROM] 
      name=RHEL CDRom 			
      baseurl=file:///media/cdrom/Server/
      gpgfile=file:///media/cdrom/RPM-GPG-KEY-redhat-release 
      enabled=1
      gpgcheck=0
    6. Verify your yum configuration files.
      • yum list httpd
      • yum list apr
  8. Install the TeamForge application packages.
    • yum install teamforge
    Attention: TeamForge installer has been optimized quite a bit. It's likely that you might come across a lot of warning messages while upgrading from TeamForge 8.2 (or earlier) to TeamForge 17.4 on the same hardware (when you run the yum install teamforge command). You can safely ignore such warning messages and proceed with the upgrade.
  9. Install the Binary application packages.
    • yum install cn-binary
  10. Set up your site's master configuration file.
    • vi /opt/collabnet/teamforge/etc/site-options.conf
    1. host: SERVICES Token
      Note: cliserver and reviewboard-adapter are the new services added in TeamForge 17.4.
      • server-01:SERVICES=ctfcore ctfcore-database ctfcore-datamart mail etl search 
        codesearch cliserver binary binary-database reviewboard reviewboard-database reviewboard-adapter
      • server-02:SERVICES=eventq mongodb redis rabbitmq
      • server-03:SERVICES=subversion cvs gerrit gerrit-database
      Note: You may remove the identifiers of components you do not want. For example, remove binary and binary-database if you are not planning to install binary repository managers such as Nexus.
    2. host: PUBLIC_FQDN Token
      server-01:PUBLIC_FQDN=my.app.domain.com
      server-03:PUBLIC_FQDN=my.scmandgit.domain.com
    3. Set the MONGODB_APP_DATABASE_NAME token with EventQ’s database name in the site-options.conf file.
      MONGODB_APP_DATABASE_NAME=orchestrate
    4. SSL Tokens
      SSL is enabled by default and a self-signed certificate is auto-generated. Use the following tokens to adjust this behavior.
      SSL_CERT_FILE=
      SSL_KEY_FILE=
      SSL_CHAIN_FILE=
      • To generate the SSL certificates, see Generate SSL certificates.
      • Have the custom SSL certificate and private key for custom SSL certificate in place and provide their absolute paths in these tokens. SSL_CHAIN_FILE (intermediate certificate) is optional.
      • All SSL certificates including self-signed certificates are added automatically.
    5. Password Tokens
      • TeamForge 7.1 and later support automatic password creation. See AUTO_DATA for more information.
      • If the token REQUIRE_PASSWORD_SECURITY is enabled, then set a value for the token, PASSWORD_CONTROL_EFFECTIVE_DATE.
        Warning: The Password Control Kit (PCK) disables, deletes or expires user accounts that don't meet the password security requirements starting from the date set for the PASSWORD_CONTROL_EFFECTIVE_DATE token. If a date is not set, the PCK disables, deletes or expires user accounts immediately. See PASSWORD_CONTROL_EFFECTIVE_DATE for more information.
      • If the token REQUIRE_RANDOM_ADMIN_PASSWORD is already set to true, then set the token ADMIN_EMAIL with a valid email address.
        ADMIN_EMAIL=root@{__APPLICATION_HOST__}
      • If you have LDAP set up for external authentication, you must set the “REQUIRE_USER_PASSWORD_CHANGEsite-options.conf token to false.
    6. PostgreSQL Tokens and Settings
    7. JAVA_OPTS

      Configure the JBOSS_JAVA_OPTS site-options.conf token. See JBOSS_JAVA_OPTS.

      Note: All JVM parameters but -Xms1024m and -Xmx2048m have been hard-coded in the TeamForge core application. You cannot manually configure any of the following default JVM parameters in the site-options.conf file.
      • -XX:+UseParallelGC
      • -XX:MaxMetaspaceSize=512m
      • -XX:ReservedCodeCacheSize=128M
      • -server
      • -XX:+HeapDumpOnOutOfMemoryError
      • -XX:HeapDumpPath=/tmp -verbose:gc
      • -XX:+PrintCodeCache
      • -Djsse.enableSNIExtension=false
      • -Dsun.rmi.dgc.client.gcInterval=600000
      • -Dsun.rmi.dgc.server.gcInterval=600000
      • -Djava.security.egd=file:/dev/urandom
      • -Djava.awt.headless=true.

      When you change the default value of a JVM parameter such as "-XX:HeapDumpPath", the JBoss runtime parameters include both the user defined and default values for the JVM parameter. However, JBoss runs with the default value and ignores any user defined value.

    8. Save the site-options.conf file.
  11. Deploy services.
    1. Move all backup files and folders including the error folder to /tmp.
      Note: This step is required to make sure that there are no backup files and folders present in /opt/collabnet/teamforge/var/james/var/mail/ to avoid any delay during provisioning.
      • cd /opt/collabnet/teamforge/var/james/var/mail/
      • mv * /tmp
    2. Run the TeamForge provision command.
      • /opt/collabnet/teamforge/bin/teamforge provision
    Note:

    The "provision" command prompts for response before it bootstraps or migrates data during TeamForge installation and upgrade respectively. Enter "Y" or "N" to proceed. For more information, see TeamForge script.

    TeamForge 17.4 (and later) installer expects the system locale to be LANG=en_US.UTF-8. TeamForge "provision" command fails otherwise.

  12. Run the /var/lib/pgsql/analyze_new_cluster.sh script.
    • su - postgres -c "/var/lib/pgsql/analyze_new_cluster.sh"

Do this step by step on SCM and Git Server (server-03)

  1. Stop TeamForge.
    If you are upgrading from TeamForge 16.7 or earlier releases:
    • /etc/init.d/collabnet stop all
    If you are upgrading from TeamForge 16.10 or later releases:
    • /opt/collabnet/teamforge/bin/teamforge stop
  2. Upgrade the operating system packages.
    • yum upgrade
  3. If the TeamForge server has SELinux enabled, run it in 'permissive' mode temporarily while installing or upgrading TeamForge. TeamForge create runtime fails otherwise.
    1. Verify if SELinux is running in enforcing mode.
      • getenforce
    2. If the output of the getenforce command is either "Disabled" or "Permissive", SELinux is already disabled.
    3. If not disabled, run the following command to bring it to 'permissive' mode.
      • setenforce 0
  4. Configure your TeamForge installation repository.
    • TeamForge installation repository configuration for sites with internet access
    1. Contact the CollabNet Support and download the TeamForge 17.4 installation repository package to /tmp.
    2. Install the repository package.
      • yum install -y /tmp/collabnet-teamforge-repo-17.4-1.noarch.rpm
    3. Refresh your repository cache.
      • yum clean all
    • TeamForge installation repository configuration for sites without internet access
    1. Contact the CollabNet Support to get the auxiliary installer package for TeamForge 17.4 disconnected installation and save it in /tmp.
      • Red Hat Enterprise Linux/CentOS 6.8 64 bit: CTF-Disconnected-media-17.4.824-110.rhel6.x86_64.rpm
      • Red Hat Enterprise Linux/CentOS 7.3 64 bit: CTF-Disconnected-media-17.4.824-110.rhel7.x86_64.rpm
      • In addition to the above CentOS 7.3 64 bit RPM package, you must get the following CentOS 7.3 compatibility RPM, which is required for TeamForge 17.4 disconnected media installation on CentOS 7.3 profile: compat-ctf-dc-media-1.1-1.el7.noarch.rpm.
    2. Unpack the disconnected installation package.
      • rpm -Uvh <package-name>
    3. Unpack the compat-ctf-dc-media-1.1-1.el7.noarch.rpm package if you are installing TeamForge 17.4 on CentOS 7.3.
      • rpm -ivh compat-ctf-dc-media-1.1-1.el7.noarch.rpm
    4. If not mounted already. mount the Red Hat Enterprise Linux/CentOS installation DVD. The DVD contains the necessary software and utilities required for installing TeamForge without internet access.

      In the following commands, replace "cdrom" with the identifier for your server's CD/DVD drive, if necessary.

      • cd /media/
      • mkdir cdrom
      • mount /dev/cdrom ./cdrom/

      If there are any spaces in the automount, unmount it first and mount it as a filepath, with no spaces.

    5. Create a yum configuration file that points to the Red Hat Enterprise Linux/CentOS installation DVD.
      • vi /etc/yum.repos.d/cdrom.repo
      Here's a sample yum configuration file.
      [RHEL-CDROM] 
      name=RHEL CDRom 			
      baseurl=file:///media/cdrom/Server/
      gpgfile=file:///media/cdrom/RPM-GPG-KEY-redhat-release 
      enabled=1
      gpgcheck=0
    6. Verify your yum configuration files.
      • yum list httpd
      • yum list apr
  5. Install the Source Code application packages.
    • yum install teamforge-scm
  6. Install the Git application packages.
    • yum install teamforge-git
  7. Copy the site-options.conf file from the TeamForge Application Server (server-01) to the SCM and Git Server's /opt/collabnet/teamforge/etc/ directory.
  8. Deploy services.
    • /opt/collabnet/teamforge/bin/teamforge provision
    Note:

    The "provision" command prompts for response before it bootstraps or migrates data during TeamForge installation and upgrade respectively. Enter "y" or "N" to proceed. For more information, see the TeamForge script.

    TeamForge 17.4 (and later) installer expects the system locale to be LANG=en_US.UTF-8. TeamForge "provision" command fails otherwise.

    During teamforge provision, the Register SCM integration process fails on sites that use self-signed certificates. Perform these steps in such cases.

    1. Restart JBoss on the TeamForge Application server.
      • /opt/collabnet/teamforge/bin/teamforge restart -s jboss
    2. Reinitialize TeamForge on the SCM and Git server.
      • /opt/collabnet/teamforge/bin/teamforge reinitialize
  9. Run the /var/lib/pgsql/analyze_new_cluster.sh script.
    • su - postgres -c "/var/lib/pgsql/analyze_new_cluster.sh"

Do this step by step on TeamForge Application Server (server-01)

  1. If you have CVS integrations, synchronize permissions post upgrade. See, Synchronize TeamForge source control integrations.
  2. Run the TeamForge post installation script. For more information, see post-install.py.
    • /opt/collabnet/teamforge/runtime/scripts/post-install.py

Do this step by step on SCM and Git Server (server-03)

  1. Update the file permissions on your site's data.
    • /opt/collabnet/teamforge/runtime/scripts/fix_data_permissions.sh
    Note: This process can take a long time on sites with a lot of data.

Do this step by step on TeamForge Application Server (server-01)

  1. Update the file permissions on your site's data.
    • /opt/collabnet/teamforge/runtime/scripts/fix_data_permissions.sh
    Note: This process can take a long time on sites with a lot of data.

Do this step by step on EventQ Server (server-02)

  1. Stop EventQ.
    • /etc/init.d/eventq stop
    • /etc/init.d/collabnet-rabbitmq-server stop
    • /etc/init.d/collabnet-mongod stop
  2. If the TeamForge server has SELinux enabled, run it in 'permissive' mode temporarily while installing or upgrading TeamForge. TeamForge create runtime fails otherwise.
    1. Verify if SELinux is running in enforcing mode.
      • getenforce
    2. If the output of the getenforce command is either "Disabled" or "Permissive", SELinux is already disabled.
    3. If not disabled, run the following command to bring it to 'permissive' mode.
      • setenforce 0
  3. Upgrade the operating system packages.
    • yum upgrade
  4. Configure your TeamForge installation repository.

    TeamForge installation repository configuration for sites with internet access

    1. Contact the CollabNet Support and download the TeamForge 17.4 installation repository package to /tmp.
    2. Install the repository package.
      • yum install -y /tmp/collabnet-teamforge-repo-17.4-1.noarch.rpm
    3. Refresh your repository cache.
      • yum clean all

    TeamForge installation repository configuration for sites without internet access

    1. Contact the CollabNet Support to get the auxiliary installer package for TeamForge 17.4 disconnected installation and save it in /tmp.
      • Red Hat Enterprise Linux/CentOS 7.3 64 bit: CTF-Disconnected-media-17.4.824-110.rhel7.x86_64.rpm
      • In addition to the above CentOS 7.3 64 bit RPM package, you must get the following CentOS 7.3 compatibility RPM, which is required for TeamForge 17.4 disconnected media installation on CentOS 7.3 profile: compat-ctf-dc-media-1.1-1.el7.noarch.rpm.
    2. Unpack the disconnected installation package.
      • rpm -ivh <package-name>
    3. Unpack the compat-ctf-dc-media-1.1-1.el7.noarch.rpm package if you are installing TeamForge 17.4 on CentOS 7.3.
      • rpm -ivh compat-ctf-dc-media-1.1-1.el7.noarch.rpm
    4. If not mounted already, mount the Red Hat Enterprise Linux/CentOS installation DVD.

      The DVD contains the necessary software and utilities required for installing TeamForge without internet access. In the following commands, replace "cdrom" with the identifier for your server's CD/DVD drive, if necessary.

      • cd /media/
      • mkdir cdrom
      • mount /dev/cdrom ./cdrom/

      If there are any spaces in the automount, unmount it first and mount it as a filepath, with no spaces.

    5. Create a yum configuration file that points to the Red Hat Enterprise Linux/CentOS installation DVD.
      • vi /etc/yum.repos.d/cdrom.repo
      Here's a sample yum configuration file.
      [RHEL-CDROM] 
      name=RHEL CDRom 			
      baseurl=file:///media/cdrom/Server/
      gpgfile=file:///media/cdrom/RPM-GPG-KEY-redhat-release 
      enabled=1
      gpgcheck=0
    6. Verify your yum configuration files.
      • yum list httpd
      • yum list apr
  5. Install the EventQ packages.
    • yum install teamforge-eventq CN-eventq
  6. Copy the site-options.conf file from the TeamForge Application Server (server-01) to the EventQ Server's /opt/collabnet/teamforge/etc/ directory.
  7. Deploy services.
    • /opt/collabnet/teamforge/bin/teamforge provision
    Note:

    The "provision" command prompts for response before it bootstraps or migrates data during TeamForge installation and upgrade respectively. Enter "y" or "N" to proceed. For more information, see the TeamForge script.

    TeamForge 17.4 (and later) installer expects the system locale to be LANG=en_US.UTF-8. TeamForge "provision" command fails otherwise.

Do this step by step on TeamForge Application Server(server-01)

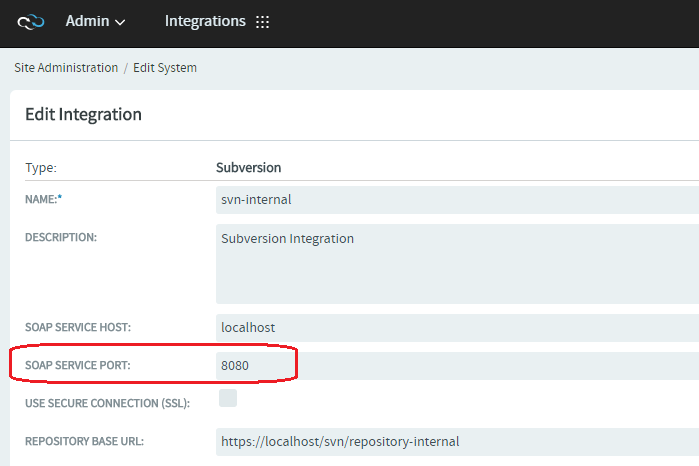
  1. Use the following URL and set the "svn-internal" SOAP SERVICE PORT to 8080 and click Save. https://<hostname>/sf/sfmain/do/editSystem?systemId=exsy1001
  2. Verify TeamForge installation.
    1. Log on to the TeamForge web application using the default Admin credentials.
      • Username: "admin"
      • Password: "admin"
    2. If your site has custom branding, verify that your branding changes still work as intended. See Customize TeamForge .
    3. Let your site's users know they've been upgraded. See Create a Side-wide Broadcast.
  3. Fix the TeamForge Avatar display issue on RHEL/CentOS 6.8. TeamForge Avatar image is not displayed properly post Review Board installation on RHEL/CentOS 6.8. Run the following commands to work around this issue:
    • yum erase python-imaging
    • yum install teamforge
    • service httpd restart